Hi!
If you’re here, I’m guessing you’re looking for a way to display your latest blog post articles in your Github profile. But just in case, you don’t know what is a Github profile you can check this link where I explain what is a Github profile and how to create one.
Since this is a very simple process (if we take advantage of some existing package, more on this later), let’s get to it without wasting any time.
Note: As always with anything related to programming, it is safe to say this is not the only way to display your posts but is one of the simplest.
What you need
- A Github profile: if you don’t have one yet, check this link to one of my latest posts or this on the Github docs.
- Github Actions: at the simplest, these so-called actions are just instructions or functions that will be called on command via Github. You can read more about them here.
- An RSS Feed: There are plenty of ways to create it and it all depends on your current project setup. In my case, my website is powered by Next.js. You can check a guide I created in case this is your case here. Alternately, check the package repo in which explains the most common sources and how to obtain the link to it, here is the complete list available.
Although we can do the process manually regarding the Github actions, we’re developers, it’s safe to say many of us are lazy. So, why reinvent the wheel?
Instead of wasting any time writing everything manually, we’ll take advantage of Gautam Krishna package for blog-post-workflow. This will make the process way easier.
Let’s get started
- Got to your Github profile page and open your README.md file for editing. Your Github profile link will be something like this:
https://github.com/<USERNAME>/<USERNAME>- Inside your README.md file copy these two lines where you want your posts rendered:
# Blog posts

<!-- BLOG-POST-LIST:START -->
<!-- BLOG-POST-LIST:END -->
Alternatively, you can edit your profile from your text editor by cloning your Github profile repo. This will make the entire process easier.
- Now, on your repo root, create the following folder structure:
.github
└───workflows
blog-post-workflow.yml
Make sure the files and folders names are correct.
- Add this content to the newly created
blog-post-workflow.ymlfile:
name: Latest blog post workflow
on:
    schedule:
        # Runs at every 2 days
        - cron: '0 0 */2 * *'
    workflow_dispatch:
jobs:
    update-readme-with-blog:
        name: Update this repo's README with latest blog posts
        runs-on: ubuntu-latest
        steps:
            - uses: actions/checkout@v2
            - uses: gautamkrishnar/blog-post-workflow@master
              with:
                  feed_list: 'URL_TO_YOUR_RSS_FEED'
Important: Please note that I created my action to run every 2 days. You can set it to run automatically by changing this line with this:
schedule:
- cron: '0 * * * *'- Commit your changes and done.
Now, depending on how you configured your Github action schedule, it may or may not run immediately.
Configure your Github Action
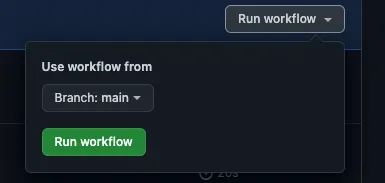
To check on your newly created action, go to your Github profile repo. In the actions tab, you should have a new Github action called Latest blog post workflow (the name depends on the name you added to the config .yml file).
You can run this action manually by clicking on the Run workflow button.
Once your Github action finishes and assuming everything went well. You should have your latest blog post listed in your Github profile in the area you designated for this at the start of the guide.
They should look like this:

That’s it!
We did it!
Finally don’t forget to check on all the options available in the Github package.
Thanks for reading until the end. See you next time!